Photo Slice

Hello! Welcome back to another update of Photoshop Tutorial. Today, we’ll look at how to create “Photo Slice” graphic design  concept using Photoshop. Here we’re going to cut an image into pieces and give it a nice slice effect. We’ll use some new tools to create of this effect so you have to focus.


Let’s start with the designing process over a new photoshop document. Let’s try having a standard document size of 1920 width and 1080height.


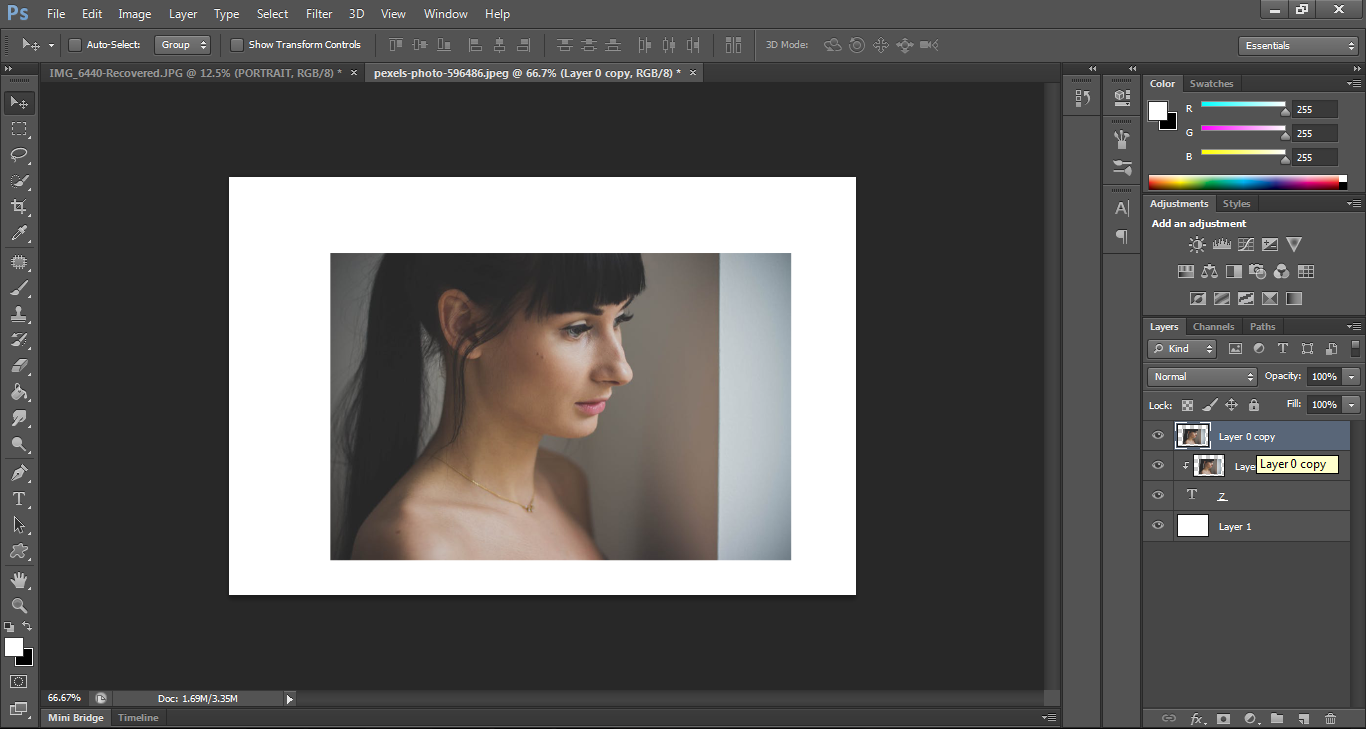
Now open the folder containing your image and drag it into photoshop. I’ll use Isha Blaaker’s photo for now.  Afterwards, scale the size of your image while pressing Alt + Shift then press Enter.


The first thing we’re going to do is to remove the background color. To remove that, we have to rasterize your layer. In order to do that, right click on your layer and pick Rasterize Layer. Next, just likethe past  lessons, you can now make a selection of your model. After making a selection, select the select options on the top bar, choose inverse and hit delete.

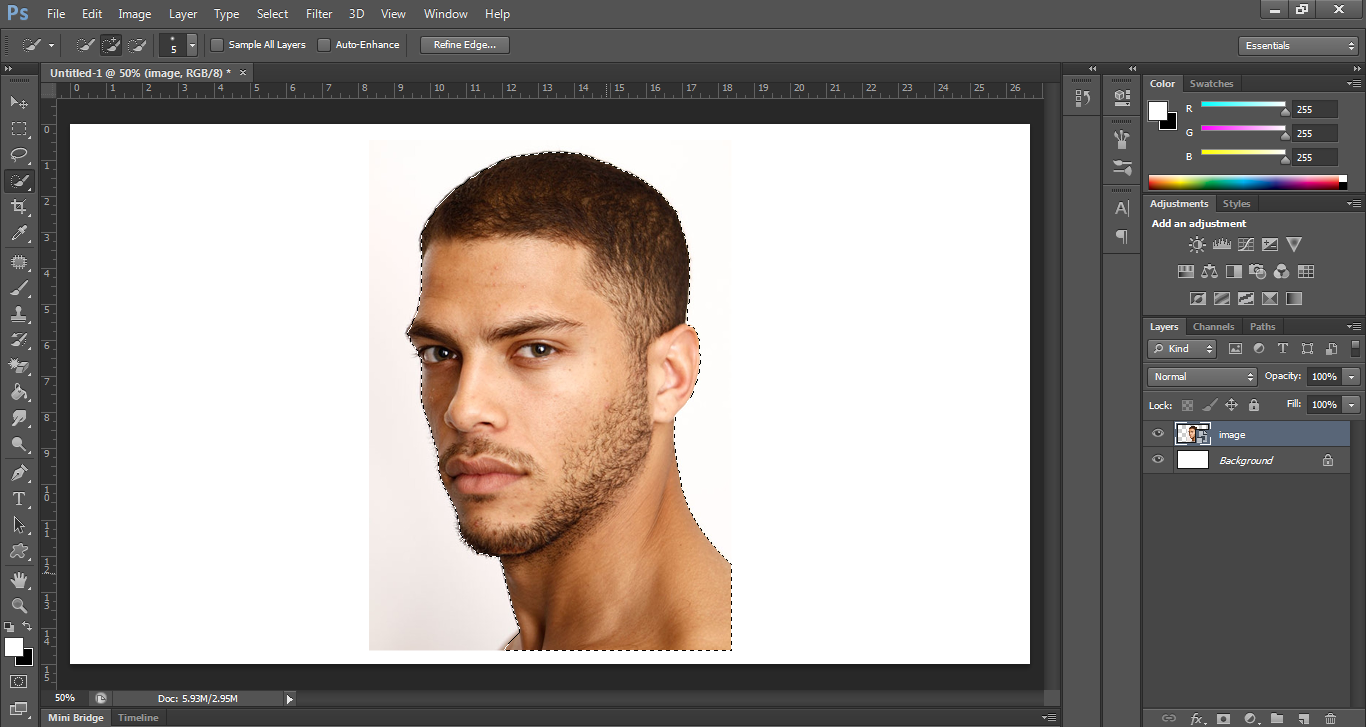
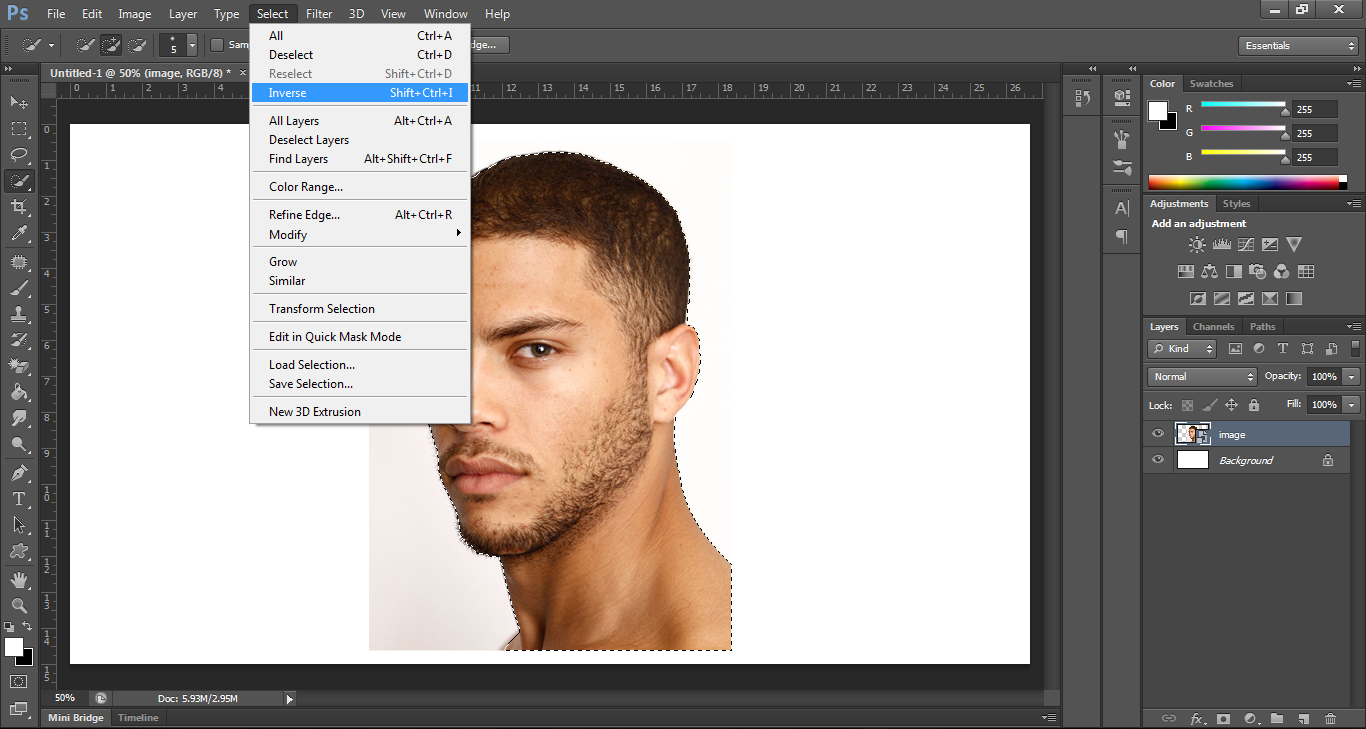
Unlock your background layer by double clicking on it and pressing okay. Then again double click on it to open the Layer Panel. Here apply color overlay and choose a dark color using the color picker option. We can see that when we changed the background color to black, white edges are visible tothe photo. To remove that, create a mask layer on your image, double click on the mask layer, click mask edge, then adjust your feather and shift edge until your satisfied with the look (decrease shift edge and add feather). We’re going to do this to have a smooth edge around the face and have a clean image. Click okay when you’re done.


Next hide the effect of the background by pressing the eye icon beside the effect on your layer 0 so that we’ll get a white color.


Do a copy of your image layer by right clicking on the layer, choose duplicate layer and hit okay. Afterwards, hide the bottom one. We’re going to need to Rasterize our image copy now by right clicking on it’s layer,Convert to Smart Object, right click again then Rasterize.


Now we’re going to turn the image into black and white. In order to do so, go to Image > Adjustments > > Black & white andthen click OK. Here we’ve got  a black & white image.


Now, we’re going to remove the bottom part of the face (the neck) because all we need here is the head. So click the pen tool and start tracing out the shape, click and drag to follow along the jaw line. After making the shape, right click and click make selection. After that, apply masks which will hide the head region. Press Ctrl + I to invert the mask. Next, double click on the layer mask and increase the feather to soften the edges.


Let us start dividing the shape into pieces. Take the pen tool and start tracing out the chin part of the face and follow along the anatomy of the face. This will create a shape. In the same way, trace out up to the nose part following along the ear shape and close the path. Do the same for the forehead region, trace it out and close the path.


After that, select the image copy layer and press right click, convert to smart object and again right click and rasterize layer.


Now make a selection by Ctrl + click on the thumbnail of our first shape. Then click the image copy layer and press Ctrl + X to cut and Ctrl+ V to paste it at the same place in a new layer. Similarly, cut and copy all the parts using the shape layers by making a selection. In this way, we’ll have all the parts in different layers.


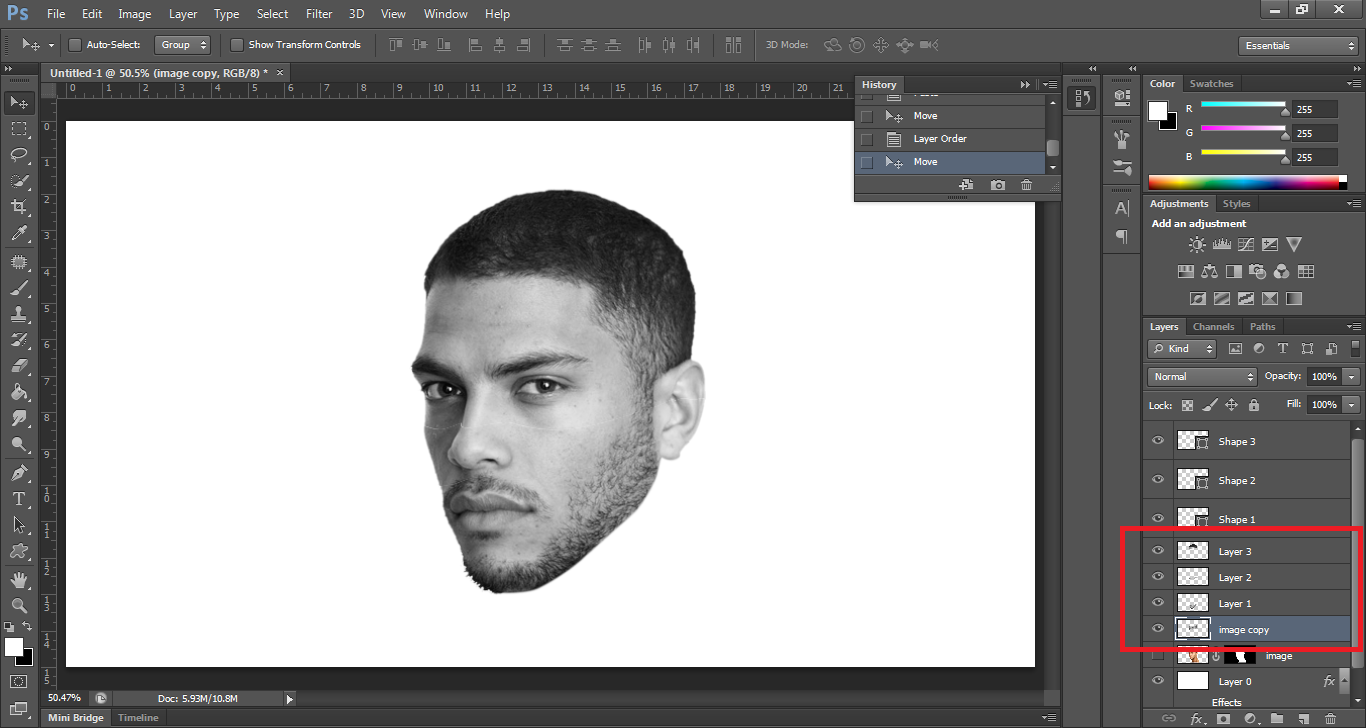
Hide out all the layers except the chin part. Using the pen tool, start creating a shape to give a slice effect. It will be used to give depth to the face. After creating a shape, go to the fill color panel and apply gradient color and place it under the chin part layer. Next, unhide the nose part and move it up a bit then by pressing the alt key, dig a copy of the shape and place it along the nose part. You can use the direct selection tool to match the shape with the flow of the curves. After the adjustments, do the same for the top parts as well.


Now let’s do the gradient color assessments of each shapes. Double-click on the shape layer to open the gradient filter panel. In that panel click on the color palette, and choose magenta color (ff008a) next select the second slider and choose a darker color. In the same way, open the color panel for the other shapes and change the colors. Nose: ff0000, 3e0000 ; Top: ff5a00, 5f2600. Now unhide the head part and move it up.


Finally, click on the ellipse tool and create out a flat oval shape under the chin to serve as a shadow. Go to Filter > Blur > Motion Blur. Make sure to rasterize your shape before performing this tasks. Afterwards, go to Filter > Blur > Gaussian Blur.


There you go. ^_^

How to Make Your Own Logo Using Photoshop


Ever wanted to create your own logo? For your calling card, invitation,stickers or even a logo for your blog? Well, you’ve come to the right place. In this article, I’m going to show you how to make a “Letter Portrait” using Adobe Photoshop.


As you can see, here are the final outputs:

Ready? Let’s begin!

First, let us choose our base photo the one we’re going to use and open it on Photoshop.

Afterwards, unlock the photo in the layers panel by simply dragging the lock icon to the delete layer icon (the one that looks like a trashcan).


Now using the pen tool or quick selection tool, make aselection of the model. Make sure that you’ll cut it out properly. When the selection is done, click on the layer mask icon and we’ll see that the  background is gone.


Now we’re going to add a white background. So let’s create a new layer under our base photo by pressing Ctrl + create new layer. Click on your new layer then paint it white using the “paint bucket” tool in the tools selection.


Temporarily, let us hide our base picture by clicking on the eye of it’s layer. Let us now click our white layer and type the letter of your choice using the type tool. For this tutorial, we’re going to use “Georgia”font. Type your letter and make it bigger by pressing Ctrl + T then press yourshift key while dragging the corners. We must make sure that it’s centered so we’re gonna press Ctrl + A then select your move tool (the one at the top of thetools icon), afterwards select the “Align vertical centers” and “Align horizontal centers” on the options found on the top bar. When your done, remove the selection by pressing Ctrl + D.

We can now turn our Layer 0 active by pressing the eye of it’s layer. I’m going to click Ctrl + T, right click and choose flip horizontal because I want the model to lean on the other side. Afterwards put it on the side of the letter where it suits the best and also change the size of the picture, it’s up to you. You can keep experimenting then go confirm it when you’redone.


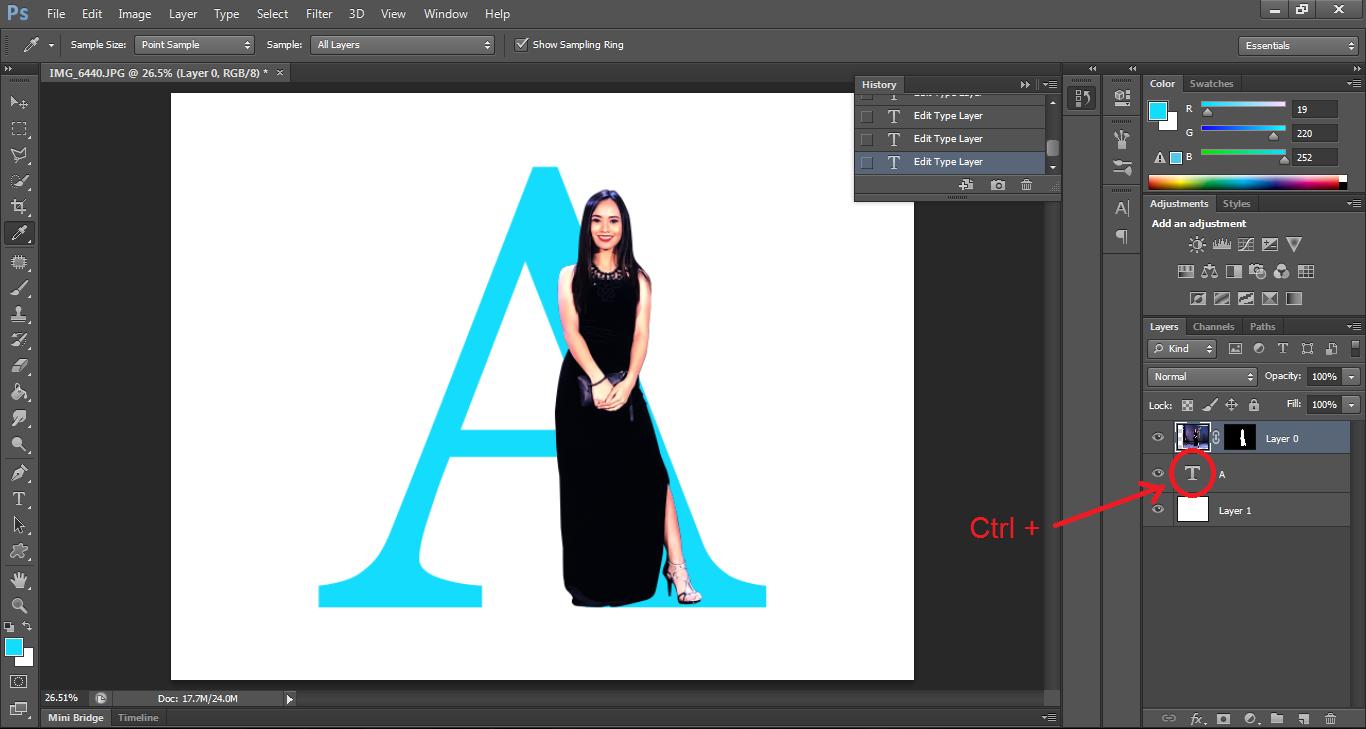
As we can see, the black font doesn’t look that great due toher black dress so we’re going to change it’s color. As for me, I’ll choose light blue to match it with the photoshop logo.


What we need to do is remove the area that is exactly outside of your letter. To do that, we need to make a selection of your letter so hold your Ctrl key and click on the thumbnail of your letter. Now we have a selection of your letter but the things we want to remove are outside the selection that’s why we’re going to go to select and then inverse. Now that the outside area is selected, we can now remove the things we want to remove. Activate your layer mask and get yourself a brush tool but make sure that the color of your brush is black. Now brush on the areas you want to remove. If you’re done,  you can now get rid of the selection by pressing Ctrl + D.

Here’s the other style of a letter portrait!


Just like the last time, open your base photo in photoshop then unlock your image. This time, let’s flip it in the beginning so press Ctrl+ T, right click and choose flip horizontal so that she’ll lean on the otherside then confirm. Afterwards, hide the layer by clicking the eye icon beside it.


Let us create a new layer by clicking the create a new layer icon and paint it white.


If the white background is ready, let us now type our letter. Select the type tool then type the letter of your choice. Make sure that it’s in the center by pressing Ctrl + A then select your move tool then choose “Align vertical centers” and “Align horizontal centers” on the options found on the top bar. When your done, press Ctrl + D to remove the selection.


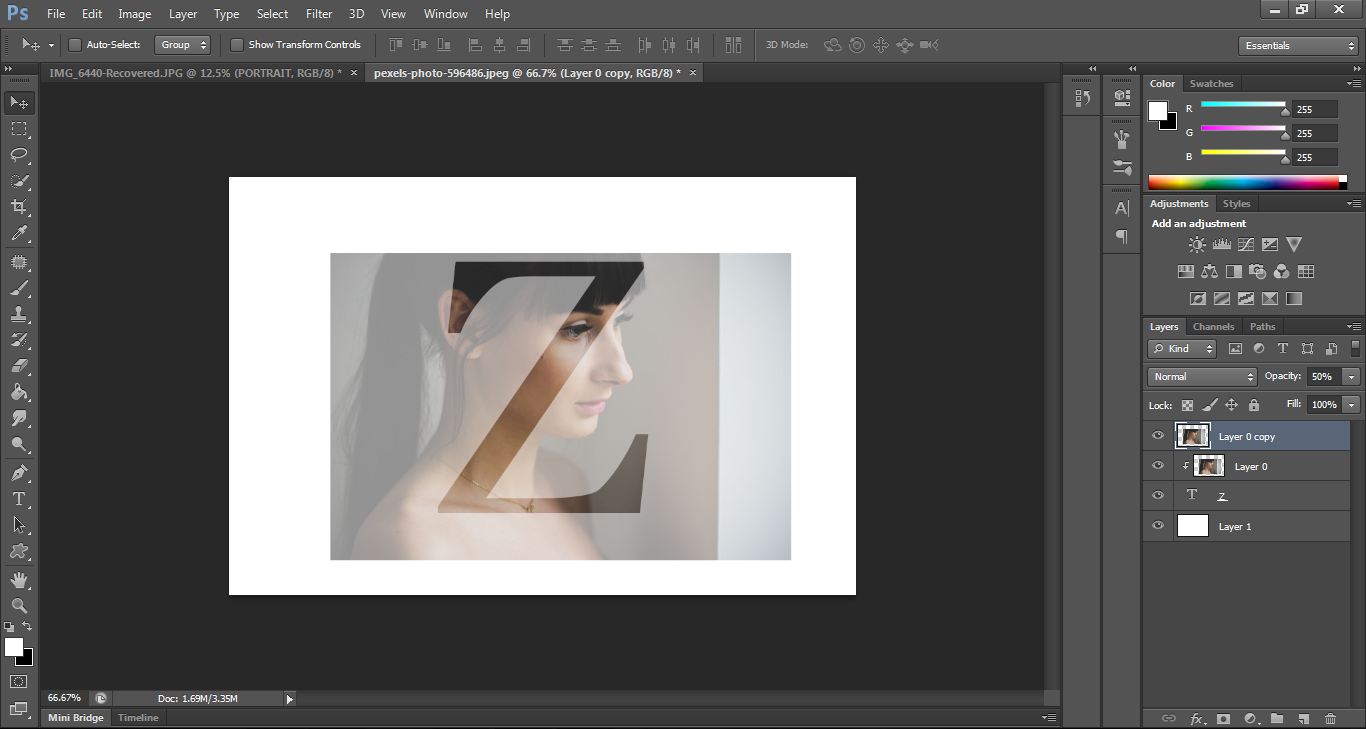
Now let’s add the photo. Select your Layer 0 and put it on top of your letter and turn on the eye so we can see it. Obviously, we need to resize the photo before creating a clipping mask so that we’ll have an idea of what we’re going to do. In order to do that, first let us reduce the opacity to 50% so we can see the A in the background. Then resize it until you’resatisfied with the look. When you’re done, confirm it and make the opacity full again.


Let us now turn your layer into a clipping mask by right clicking on your Layer 0 and choose clipping mask.


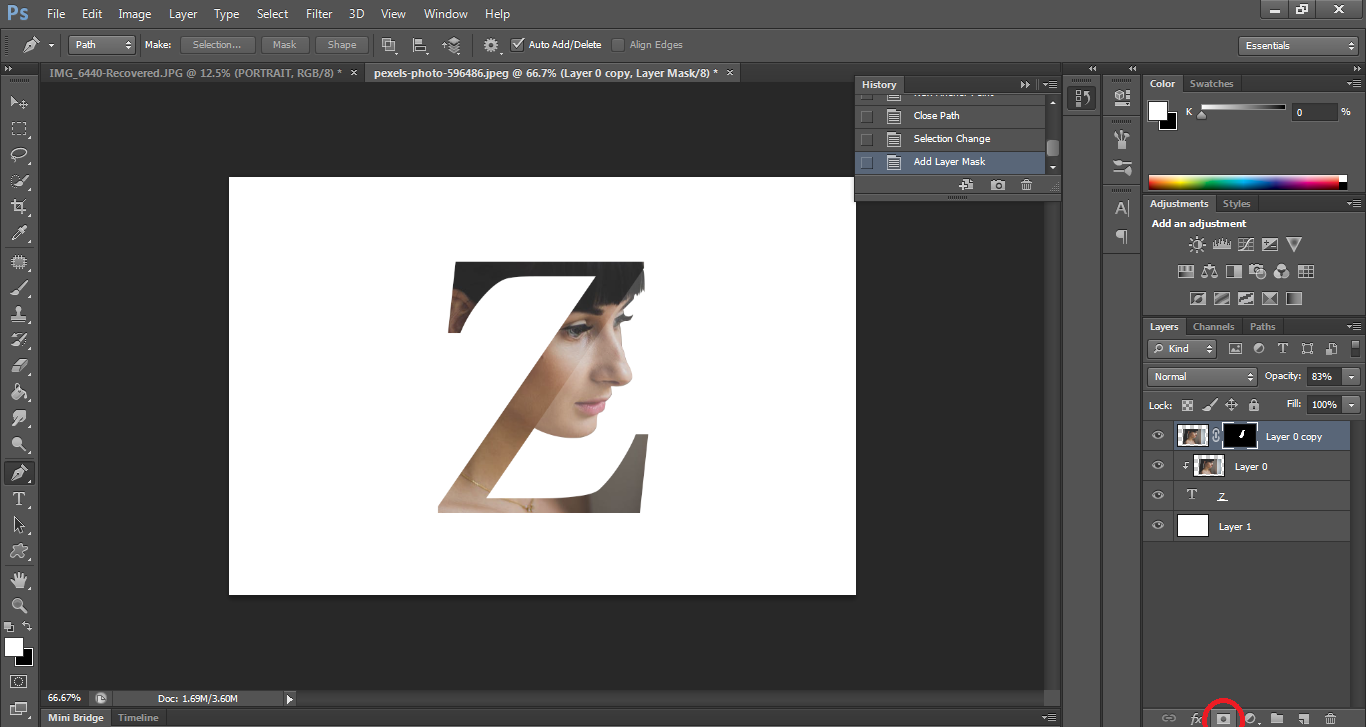
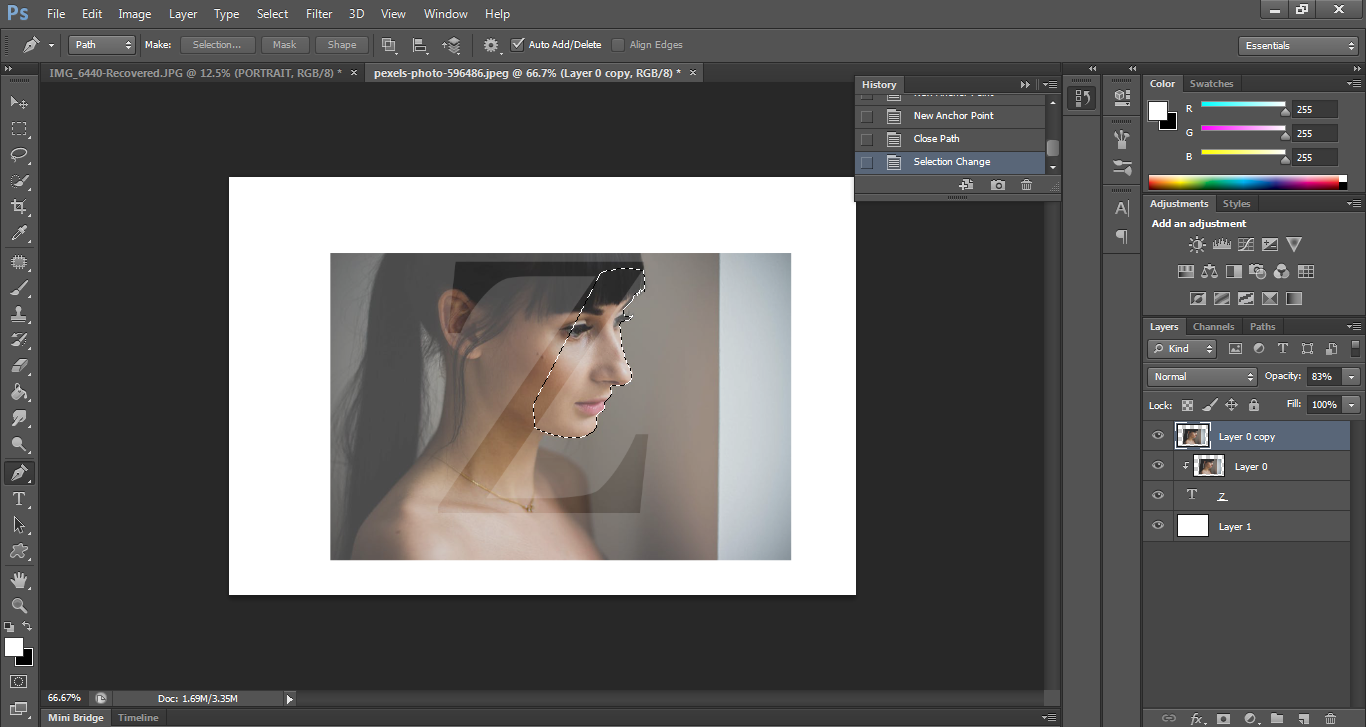
After, create a copy of Layer 0 by clicking on it then press Ctrl + J. Reduce the opacity of your new layer so to see what you have to remove and what remains. I’ll use the pen tool to make a selection of what remains. When you already have your selection, click the layer mask icon andvoila! you’ve got yourself a logo! CONGRATULATIONS! ^_^

Photoshop Tutorial for Beginners

“Photoshop is an art and you can do a lot with it. Change the atmosphere through different lighting and make the pictures look more interesting”

Crystal Renn

It’s been 28 years since the Photoshop was introduced to our lives. Way back, this complicated weapon was used by graphic designers only. Now, anyone with computer access and the right guide can master this editing program easily. 

I started using Photoshop when I was in 9th grade. It was introduced to me by my father. Since then, during my past time, I watch photoshop tutorials on Youtube or read some blogs teaching some techniques. This photo editing tool helped me in various ways. I have tried designing a shirt for our class and school, posters for election and events, invitation cars, newspaper, etc. Having knowledge in Adobe programs is a must-have nowadays, so let me help you begin your journey.

I’ll start from the basic tools usually used in Photoshop. If you want to learn more techniques, subscribe and wait for more updates.

Note: The shortcuts for in this article are applicable for PC users only.


How Transform a Picture

Resize it, rotate it, flip it, distort it!

Click Edit > Transform > and select the the action you want to do

To make it quicker and easier, you can use these shortcuts:

Press Ctrl + T on your keyboard. A bounding box will now appear around your image, a sign that it’s ready for transformation. You can now resize your image. Tip: Hold the shift key while dragging the corners so that the proportion of your picture will stay the same. Then press Enter when you’re done.

To flip your image vertically or horizontally, again, press Ctrl + T and then right click your mouse. A selection of actions will now appear containing the options for rotating and flipping the image. You can now select the action you desire then press Enter when you’re done.

Using this method, you can also skew, distort, warp or change the perspective of an image. Try it for yourself! 🙂


Choose the Unit of Measurement

Changing or choosing the units of measurements of your images is also possible, press Ctrl + R to show or hide the rulers in your grid then place the cursor on the ruler and right click on it. You can now choose a new unit from the context menu. You can find varietyof units there such as pixels, centimeters, millimeters, points, picas, etc.


The Magnetic Lasso Tool

The Lasso tool, a very helpful tool in photo editing is used to 
trace and outline the exact part of an image that you’re looking to edit. Afterwards, you can now separate it from the original image and perform certain actions. This works best when you have a bold contrast between the object and its background with well-defined edges.

To access the Magnetic Lasso:

  1. Right click on the Lasso tool until a fly-out menu appears
  2. When the fly-out menu appears, choose the last one with a small magnet on it’s icon
  3. Select the icon then go back to your image layer
  4. Click your mouse once, release and just go over the edges of the object you want to select. Imagine you’re using a scissor and you’re cutting something.

The Magic Wand!!!

Oftenly used to change or tweak the backgrounds of an image. It is ideal to use with a monotone and consistent background.

How to use it:

Choose the Magic Wand tool from the tools panel (the one that looks like a magician’s wand) then click on the part of the image you want to modify. Make sure that the “add to selection” is the one clicked on the options on the top bar so that you can go and switch up the colors and tones of the selected area. ^_^


How to Add Shapes

You can easily add shapes and design elements such as square, line, circle, ellipse etc. using the Custom Shape tool. You can easily find it in the tool panel, represented by an icon that kind of looks like a blob or a puzzle piece.

More shapes are accessed by clicking on the small arrow on the right side of the panel. You can find boarders, banners, speech bubbles, arrows and more. See for yourself 😀


Adjustment Layers

If you are finding a way to apply color or tone alterations to an image, while keeping the original photo in tact, the Adjustment Layer tool is the one for you. This feature adds an extra layer so that you can quickly reverse your changes. You can locate Adjustment Layers in the bottom of the the Layers Panel, the one with a black and white circle icon. It is useful to those who wants to improve the color, brightness, contrast and vibrance of their raw pictures.


Layer Styles

Layer Styles are special effects that can be quickly applied to individual layers of your image. All you have to do is double click on a layer and then choose the effect you like.

You can select from a whole variety of features, add a stroke or a glow, drop a shadow, and much more with just a click of the mouse. However we must be cautious on using it because if we overdo these effects, your image might have a tendency to look cheap or jejemon.


The Famous “Healing Brush”

The most famous tool of Photoshop. It was made to remove life’s little imperfections such as pimples, scars or blemishes. If you want to remove that annoying pimple, this is the tool for you! All you have to do is place the brush over the area, make sure the brush is a bit bigger than the blemish
(you can use the square brackets to adjust your brush size) then click. Voila! Pimple gone! How does it work? Well Photoshop automatically matches the color of the area to it’s surroundings to achieve natural look.

By Nathaly Myers

“Don’t practice until you get it right.

Practice until you can’t get it wrong”

Anonymous